macOS 基础开发环境设置指南
准备工作
本文记录在 MacBook 上打造基础开发环境的一些步骤和注意事项 🤪
在开始前,我们需要:
安装 Xcode
Xcode 是 Apple 自家的 集成开发环境(IDE),它除了可用于开发 iOS、iPadOS、macOS、tvOS、watchOS 的应用程序外,还附带一个基本命令行套件包含 macOS 下一些基本的编译器、工具链等。后面安装的一些应用程序,如 Homebrew 在安装的时候都会需要,这里有两种可选的安装方法:
- 从 App Store 或者 Apple 开发者网站 下载安装 Xcode 3 ,安装后第一次打开会让你安装一些组件
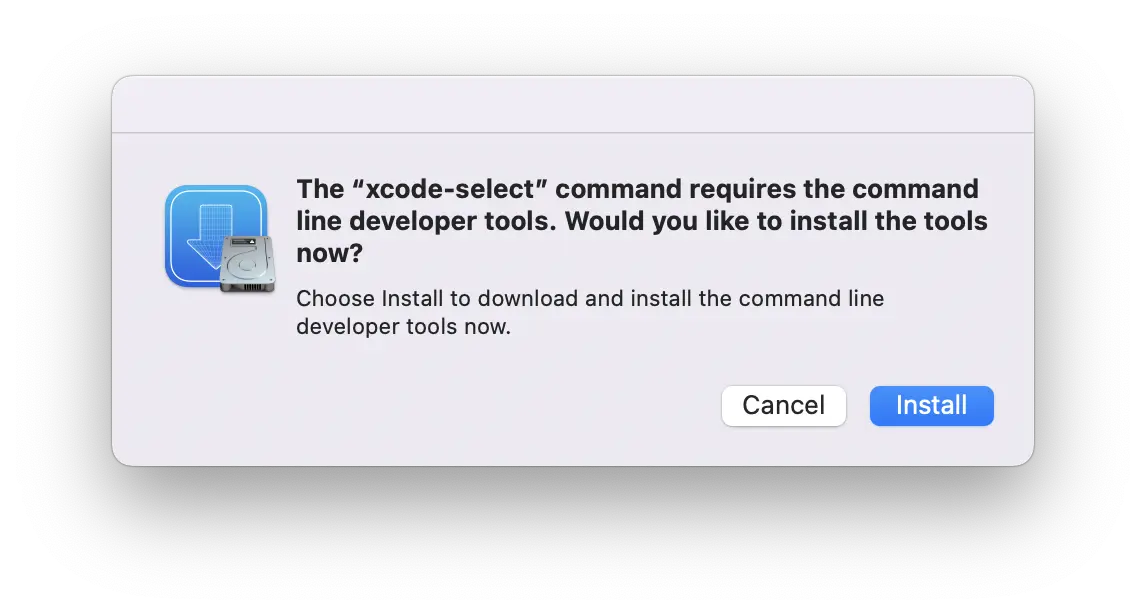
- 打开 macOS 终端模拟器,输入命令 xcode-select --install 安装所需组件 4
如果没有 Apple 开发相关的需求就没必要安装完整的 Xcode 了,直接安装 Xcode 命令行工具即可 🥲
安装 Homebrew
Homebrew 是 macOS 必不可缺的包管理器,打开终端模拟器,开始安装
$ /bin/bash -c "$(curl -fsSL https://raw.githubusercontent.com/Homebrew/install/HEAD/install.sh)"
出现提示按 Enter ⏎ 确认即可,安装完成后会提示将 Homebrew 加入环境变量
# dejavu 是笔者的用户名,安装完 Homebrew 可以直接复制提示的命令
# 将 brew 加入用户配置文件
$ echo 'eval "$(/opt/homebrew/bin/brew shellenv)"' >> /Users/dejavu/.zprofile
# 将 brew 加入环境变量
$ eval "$(/opt/homebrew/bin/brew shellenv)"
验证安装
$ brew doctor
Your system is ready to brew.
brew 常用命令
# 更新 brew
$ brew update
# 搜索软件包
$ brew search <package name>
# 查看软件包信息
$ brew info <package name>
# 查看软件包主页/官网
$ brew home <package name>
# 查看指定软件包的所有版本
$ brew list --versions | grep <package name>
# 安装软件包
$ brew install <package name>
# 卸载软件包
$ brew uninstall <package name>
# 查看需要升级的软件包
$ brew outdated
# 锁定指定软件包的版本
$ brew pin <package name>
# 解除对指定软件包版本的锁定
$ brew unpin <package name>
# 更新指定的软件包
$ brew update <package name>
# 更新所有需要升级的软件包
$ brew upgrade
# 允许 cask 仓库的软件也能被更新(建议关闭所有软件的内置更新,仅通过 brew 更新)
$ brew upgrade --greedy
# 查看有哪些旧软件包会被清理
$ brew cleanup --dry-run
# 清理旧软件包
$ brew cleanup
# 列出已经安装的软件包
$ brew list
# 列出已经安装的软件包及版本信息
$ brew list --versions
# 以树状图展示「已安装包」的依赖信息
$ brew deps --installed --tree
安装软件包
基本软件包
这些是基本软件包,建议安装
$ brew install zsh \
   wget \
   curl \
   git \
   openssh \
   gnupg \
   cmake \
   vim \
   tree \
   nvm \
   aria2 \
   ffmpeg \
   htop \
   neofetch \
   go
常用软件
常用软件,可以选择安装
$ brew install --cask clash-for-windows \
    iterm2 \
    telegram-desktop \
    typora \
    google-chrome \
    visual-studio-code \
    coteeditor \
    iina \
    intellij-idea \
    golang \
    datagrip \
    mos \
    pycharm \
    obsidian \
    notion \
    lark \
    keka \
    c0re100-qbittorrent \
    lark \
    shottr
Logitech Options
不建议用鼠标,很难用 🤡
罗技鼠标的管理软件,如没有可忽略,鼠标建议搭配 Mos 平滑滚动使用
# brew 添加驱动程序库
$ brew tap homebrew/cask-drivers
# 搜索 Logitech 相关的软件包
$ brew search logitech
==> Formulae
logcheck

==> Casks
logitech-camera-settings                logitech-firmwareupdatetool             logitech-gaming-software                logitech-options                        logitech-unifying
logitech-control-center                 logitech-g-hub                          logitech-myharmony                      logitech-presentation

# 安装 Logitech Options
$ brew install logitech-options
==> Caveats
You must reboot for the installation of logitech-options to take effect.

==> Downloading https://download01.logi.com/web/ftp/pub/techsupport/options/options_installer.zip
######################################################################## 100.0%
Warning: No checksum defined for cask 'logitech-options', skipping verification.
==> Installing Cask logitech-options
==> Running installer for logitech-options; your password may be necessary.
Package installers may write to any location; options such as `--appdir` are ignored.
Password: # 输入用户密码
installer: Package name is
installer: Installing at base path /
installer: The install was successful.
🍺  logitech-options was successfully installed!
重启电脑后记得将 Logitech Options 添加到 Mos 的排除列表
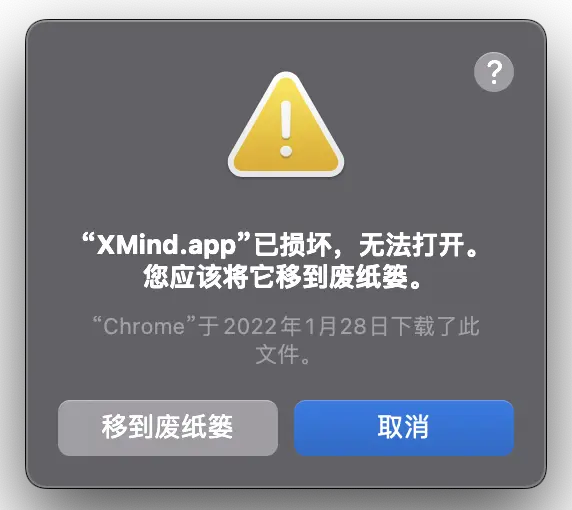
“xxx.app” 已损坏,无法打开
对于非 App Store 安装的应用,在第一次打开时,macOS 会对其进行签名认证,如果安装的是个人开发者的第三方应用或破解应用会出现这种提示,这不是软件包真的损坏了,而是被系统保护策略拦截了
打开 Finder 导航到「应用程序」菜单,打开终端,输入命令
# [Application Directory] 不需要输入,直接把应用程序拖到终端里就好了
$ sudo xattr -r -d com.apple.quarantine [Application Directory]
# 以上面的 XMind 为例
$ sudo xattr -r -d com.apple.quarantine /Applications/XMind.app
Password: # 输入管理员密码
现在应用应该可以正常运行了~
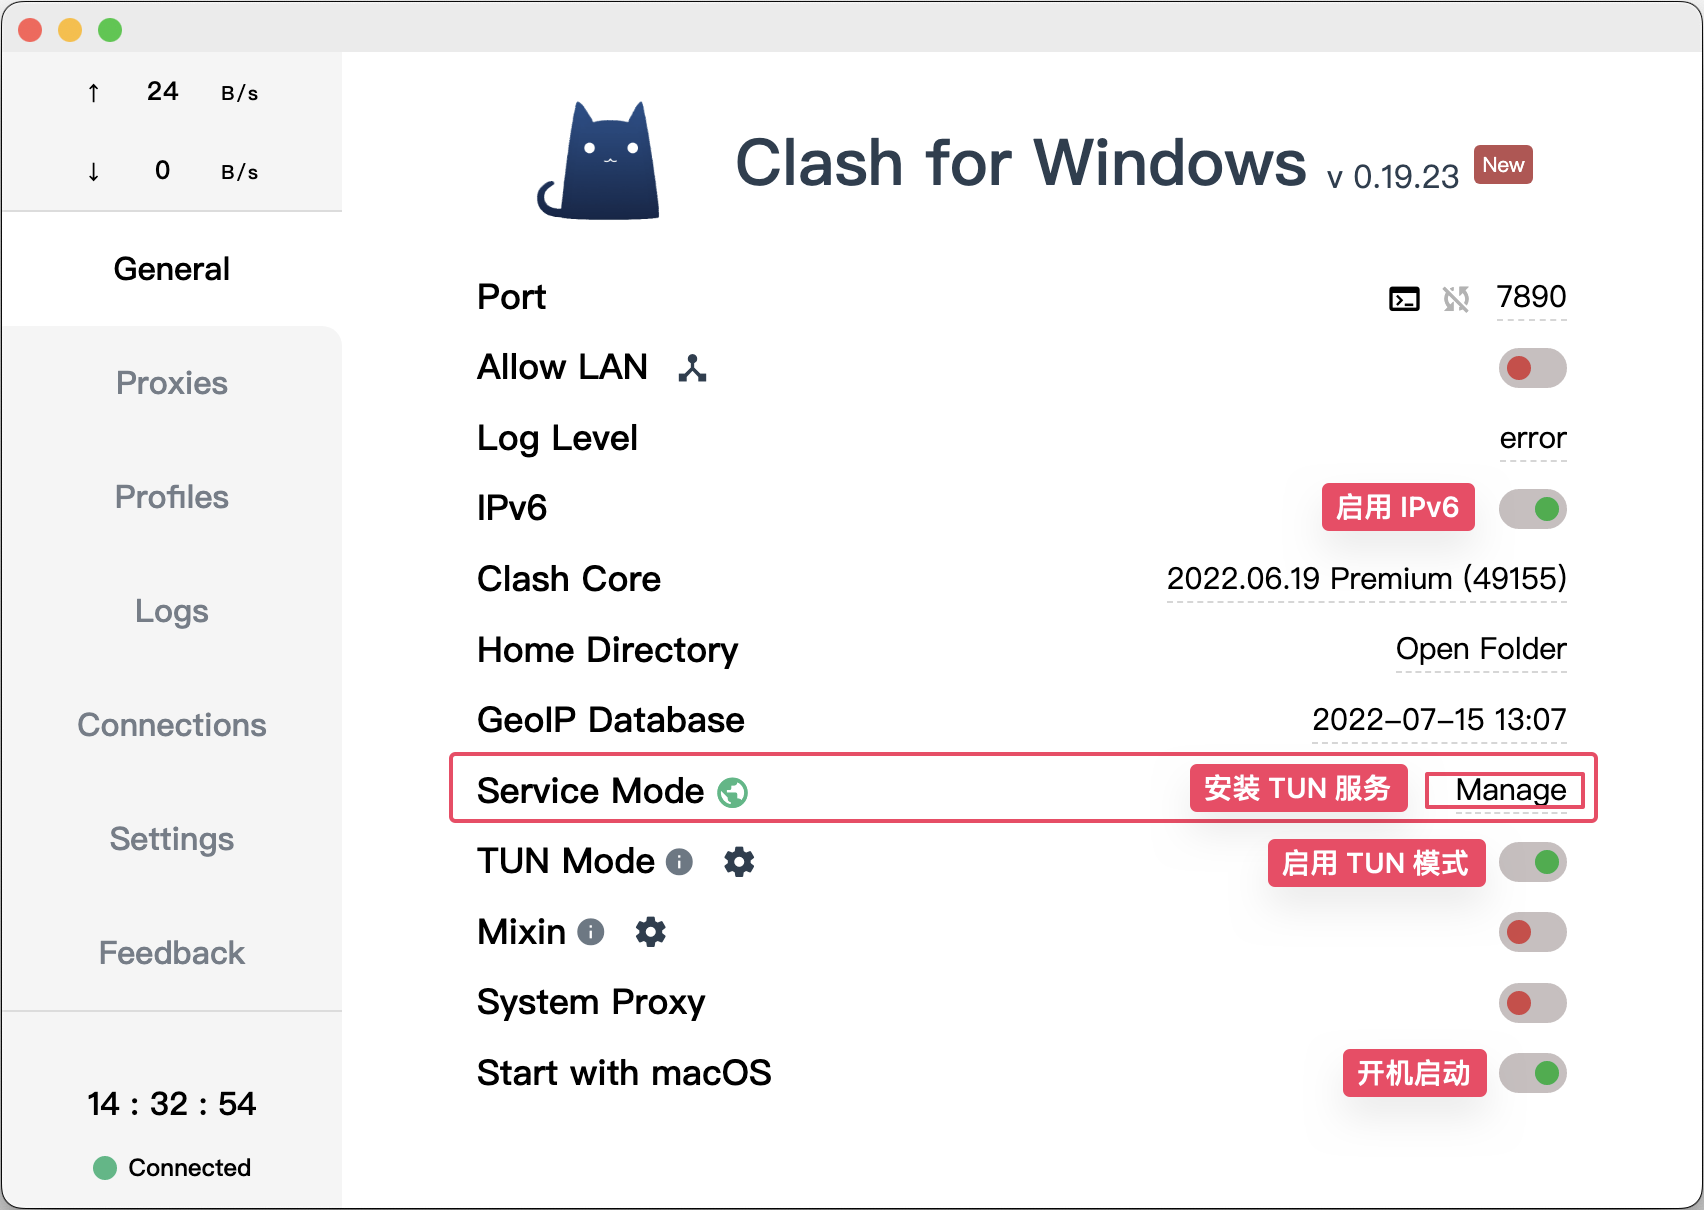
CFW TUN 模式
使用 Clash for Windows 的 TUN 模式接管系统的所有流量,免除手动设置代理的麻烦
- 打开 Clash for Windows
- 进入菜单 Genral ⇒ Service Mode ⇒ Manage
- 点击 Install 安装 TUN 服务
- CFW 弹出来提示 ⇒ 给予所需权限
- CFW 重启后打开 TUN Mode 开关即可
其他功能开关可以自己选择 🥹
Git
Git 的配置此处就不做赘述,macOS 的 Finder 会在目录下生成一些隐藏文件(如 .DS_Store),我们可以使用 GitHub 维护的 macOS .gitignore 模板,并让它对当前用户所有的 Git 存储库都生效
$ curl https://raw.githubusercontent.com/github/gitignore/master/Global/macOS.gitignore -o ~/.gitignore
# 附加到全局 .gitignore 文件
$ git config --global core.excludesfile ~/.gitignore
打造个性化终端
iTerm2
iTerm2 是 macOS 系统终端的开源替代品,它是高度可定制化的,并且功能十分强大,应该是 macOS 最好用的终端模拟器之一。
前面安装「常用软件」部分我们已经安装好了 iTerm2,否则可以现在安装
$ brew install --cask iterm2
打开 VScode 设置,找到 Terminal ⇒ External: Osx Exec,输入 iTerm.app 5 定义在 macOS 上运行的默认终端模拟器

移除每次启动终端都会显示 Last Login 时间
打开 iTerm Terminal 出现上次登陆时间,就像下面这样

如果不想它出现,在当前用户目录下创建一个空的 .hushlogin 文件即可
$ cd ~ && touch .hushlogin
字体
在 iTerm2 中,终端的字体可以对正常字体和非 ASCII 字体进行单独的设置,Nerd-Fonts 是一个使用大量字形(图标)修补开发人员目标字体的项目
小编 目前 iTerm2 使用的字体是 font-fantasque-sans-mono-nerd-font + 霞鹜文楷 的搭配,后者用于非 ASCII 字符的显示(如 CJK 字符)
分别安装这两种字体
# brew 添加字体库
$ brew tap homebrew/cask-fonts
# 搜索可用 Nerd Font 字体
$ brew search nerd-font
# 以 font-fantasque-sans-mono-nerd-font 为例(笔者比较喜欢这个字体🥰)
# 安装喜欢的 nerd-font 字体
$ brew install font-fantasque-sans-mono-nerd-font
# 安装「霞鹜文楷」字体
$ brew install font-lxgw-wenkai
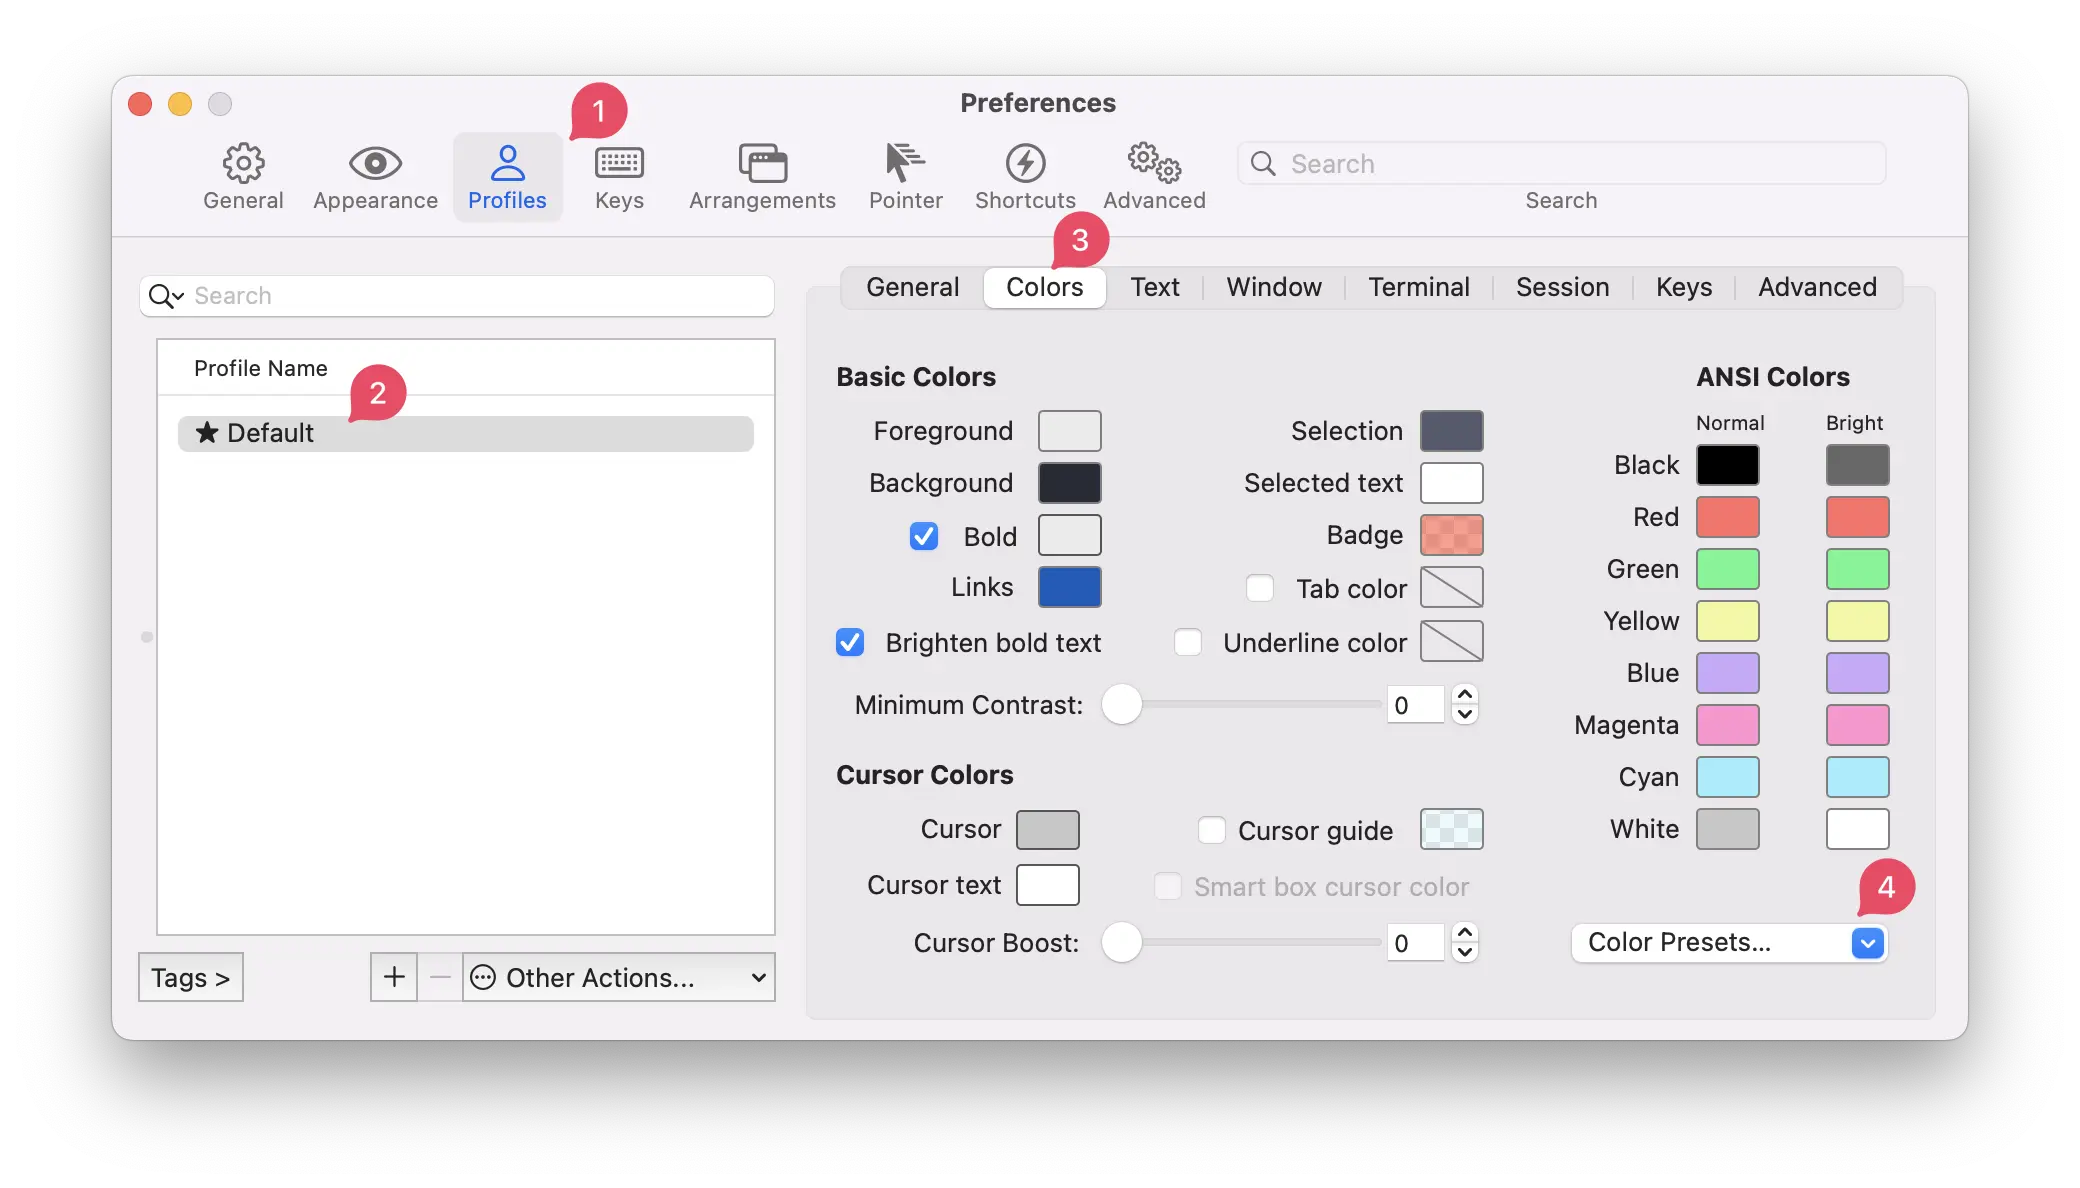
重新启动 iTerm2,按 ⌘ + , 打开 iTerm2 的偏好设置,按照下图所示修改字体

安装主题
Dracula 主题很好看,下面给 iTerm2 装上
$ git clone https://github.com/dracula/iterm.git
点击 import 导入 Dracula.itermcolors 文件,然后选择 Dracula 主题即可
Zsh
macOS 现在默认 Shell 是 Zsh 了(以前是 Bash),下面我们可以一边验证一边修改
# macOS 预设的 Shell
$ cat /etc/shells

# List of acceptable shells for chpass(1).
# Ftpd will not allow users to connect who are not using
# one of these shells.

/bin/bash
/bin/csh
/bin/dash
/bin/ksh
/bin/sh
/bin/tcsh
/bin/zsh

# 查看当前正在使用的 Shell
$ echo $SHELL
/bin/zsh

# 查看 zsh 版本
$ zsh --version
zsh 5.9 (arm-apple-darwin21.3.0)

# 将 brew 安装的 zsh 路径添加到 /etc/shells
$ sudo sh -c "echo $(which zsh) >> /etc/shells"
# 更改当前使用的 Shell
$ chsh -s $(which zsh)
Changing shell for dejavu.
Password for dejavu: # 输入密码即可

# 验证当前使用的 Shell
$ echo $SHELL
/opt/homebrew/bin/zsh
如果你的 macOS 系统语言是中文,终端里会使用系统语言作为 locale 设置,笔者想要终端里的 Shell 显示语言为英语,可以编辑 zsh 配置文件
# 编辑 zsh 配置用户
$ vim ~/.zshrc
# 在开头加入以下配置
# You may need to manually set your language environment
export LANG=en_US.UTF-8
oh-my-zsh
oh-my-zsh 是一个令人愉快的、开源的、社区驱动的框架,用于管理您的Zsh配置。它捆绑了数千个有用的功能、帮助器、插件、主题和一些让你大呼过瘾的东西。
# 通过 cURL 安装
$ sh -c "$(curl -fsSL https://raw.github.com/ohmyzsh/ohmyzsh/master/tools/install.sh)"

# 或是通过 Wget 安装
$ sh -c "$(wget https://raw.github.com/ohmyzsh/ohmyzsh/master/tools/install.sh -O -)"
oh-my-zsh 的默认主题是 robbyrussell,笔者比较喜欢简洁的 ys 主题 6
# 编辑配置文件
$ vim ~/.zshrc
# 找到 ZSH_THEME 字段
ZSH_THEME="robbyrussell"
# 将 robbyrussell 改为 ys 即可
ZSH_THEME="ys"
# 使配置文件生效
$ source ~/.zshrc
接下来安装几个 Zshell + oh-my-zsh 的增强插件
zsh-z
zsh-z 快速跳转到经常访问的目录,是 rupa/z 的原生 Zshell 端口,具有附加功能
# 源码安装
$ git clone https://github.com/agkozak/zsh-z ${ZSH_CUSTOM:-~/.oh-my-zsh/custom}/plugins/zsh-z
# 编辑配置文件
$ vim ~/.zshrc
# 找到 plugins 字段,加入 zsh-autosuggestions
plugins=(git zsh-z)
# 配置文件生效
$ source ~/.zshrc
zsh-autosuggestions
zsh-autosuggestions 可以根据历史记录对输入进行提示和建议
# 源码安装
$ git clone https://github.com/zsh-users/zsh-autosuggestions ${ZSH_CUSTOM:-~/.oh-my-zsh/custom}/plugins/zsh-autosuggestions
# 编辑配置文件
$ vim ~/.zshrc
# 找到 plugins 字段,加入 zsh-autosuggestions
plugins=(git zsh-z zsh-autosuggestions)
# 配置文件生效
$ source ~/.zshrc
zsh-syntax-highlighting
zsh-syntax-highlighting 可以对 Shell 中的命令进行高亮显示
$ git clone https://github.com/zsh-users/zsh-syntax-highlighting.git
echo "source ${(q-)PWD}/zsh-syntax-highlighting/zsh-syntax-highlighting.zsh" >> ${ZDOTDIR:-$HOME}/.zshrc

$ source ./zsh-syntax-highlighting/zsh-syntax-highlighting.zsh
可以 👉 在这里查看 可用的 Zshell 插件
至此,macOS 基本的环境配置已经结束了,后续可以按照自己需求进行更多个性化的设置🥹
一些补充点
Rosetta 2
Rosetta 2 使搭配 Apple Silicon 的 Mackintosh 运行为配备 Intel 处理器而构建的应用,一般在第一次打开为 Intel 处理器构建的应用时会弹出提示要求安装,如果你没有安装,可以在终端执行安装
$ /usr/sbin/softwareupdate --install-rosetta --agree-to-license
参考资料:


 湘公网安备 43102202000103号