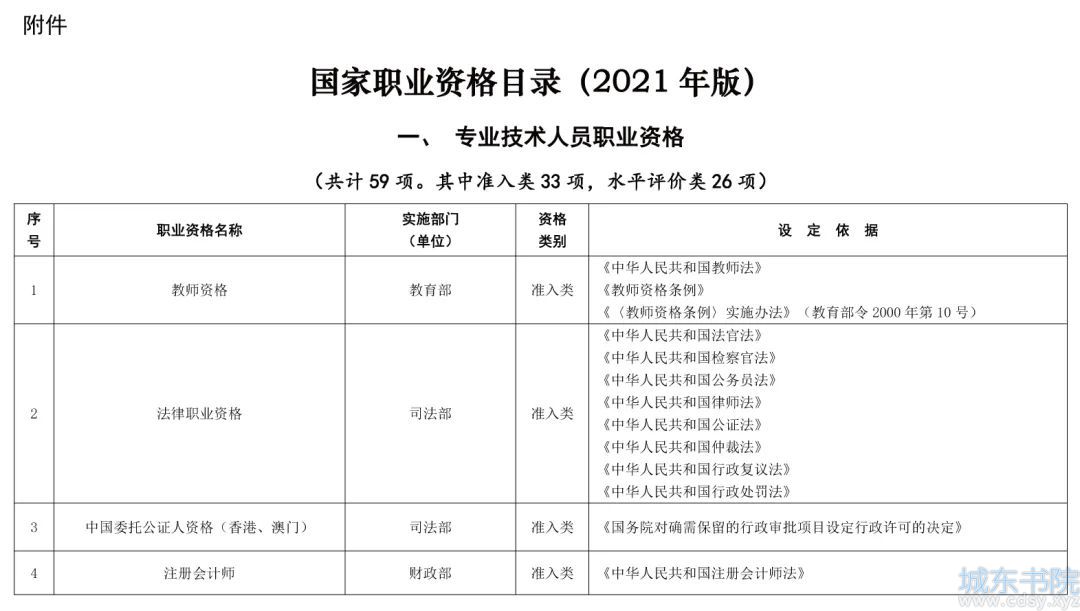
在 macOS 上配置 VS Code 使用 PowerShell(适配 Homebrew 安装)
时间:09-08来源:作者:点击数:
PowerShell 是跨平台的自动化脚本语言,非常适合管理系统配置和批量任务。而 VS Code 则是开发者首选的轻量级编辑器。本文将手把手教你如何在 macOS 上通过 Homebrew 安装 PowerShell 并配置 VS Code 正确识别它。
🧰 环境信息
- 操作系统:macOS (Apple Silicon)
- PowerShell 安装方式:Homebrew
- VS Code 插件:PowerShell Extension(Microsoft 出品)
🍺 安装 PowerShell
推荐通过 Homebrew 安装 PowerShell:
brew install powershell/tap/powershell
安装完成后,确认 PowerShell 可执行文件路径:
command -v pwsh
通常会是:
/opt/homebrew/bin/pwsh
❌ VS Code 无法识别 PowerShell?
安装好 PowerShell 后,在 VS Code 中打开 .ps1 脚本时,可能会出现如下报错:
“Unable to find PowerShell! Do you have it installed?”

这是因为 VS Code 默认不会去 /opt/homebrew/bin/ 下面查找 pwsh。
✅ 正确配置 VS Code 支持 PowerShell(手动方式)
- 打开 VS Code 命令面板(快捷键 Cmd + Shift + P)
- 输入并选择 Preferences: Open User Settings (JSON)
- 添加以下配置:
"powershell.powerShellAdditionalExePaths": {
  "Homebrew PowerShell": "/opt/homebrew/bin/pwsh"
},
"powershell.powerShellDefaultVersion": "Homebrew PowerShell"
完整示例(保留你已有的设置):
{
  "redhat.telemetry.enabled": true,
  "powershell.powerShellAdditionalExePaths": {
    "Homebrew PowerShell": "/opt/homebrew/bin/pwsh"
  },
  "powershell.powerShellDefaultVersion": "Homebrew PowerShell"
}
保存后重启 VS Code,右下角应该可以看到 PowerShell 已加载。


🌟 推荐增强设置(可选)
"powershell.integratedConsole.showOnStartup": false,
"powershell.scriptAnalysis.enable": true,
"powershell.codeFormatting.autoCorrectAliases": true
解释:
- showOnStartup: 不自动弹出 PowerShell 控制台
- scriptAnalysis.enable: 启用代码规范检查
- autoCorrectAliases: 自动将别名如 ls 替换为 Get-ChildItem
❓ Parallels Desktop 相关配置是啥?
如果你看到以下类似配置:
"parallels-desktop.git.path": "/usr/bin/git",
"parallels-desktop.brew.path": "/opt/homebrew/bin/brew"
说明你安装了 Parallels 的 VS Code 插件,用于与虚拟机环境交互。这些配置不会影响 PowerShell 的使用。
🧹 清理建议(可选)
如果你不再使用 Parallels 插件,可以手动移除相关配置项,不影响其他功能。
✅ 总结
配置 VS Code 正确识别 Homebrew 安装的 PowerShell,只需 3 步:
- 安装 PowerShell:brew install --cask powershell
- 添加路径配置到 settings.json
- 安装并启用 PowerShell 插件(来自 Microsoft)
至此,你的 macOS + VS Code + PowerShell 开发环境就准备好了!可以尽情享受跨平台脚本的快乐 🚀
方便获取更多学习、工作、生活信息请关注本站微信公众号


推荐内容

相关内容
栏目更新
栏目热门
本栏推荐

 湘公网安备 43102202000103号