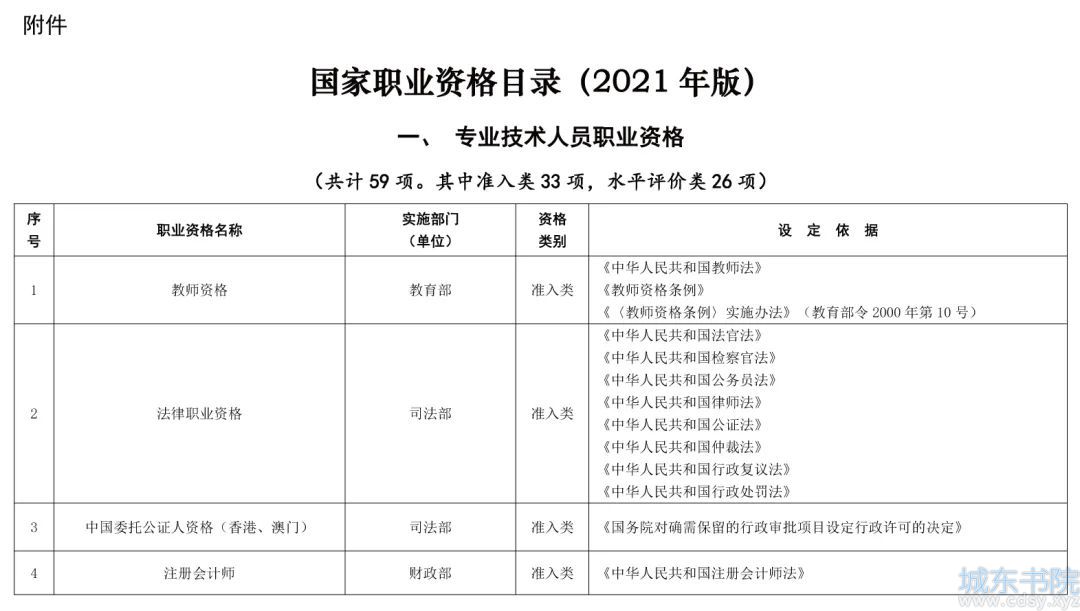
Python代码生成图片撕边效果遮罩(可用于PPT/PS/Illustrator)
时间:04-22来源:作者:点击数:
起因
看到有些截图软件能做成撕边的效果

觉得这个在PPT汇报中也可以用,只是不想再装一个截图软件,何况有些截图是别人截好了的,应该直接在PPT中处理一下图片就行。
思路
PPT我最初的思路是用VBA生成一个撕裂的形状,再跟图片做布尔运算,但是让几个AI工具试着写了写,发现VBA的自由度真心不够,也很难生成比较自然的撕纸效果。于是改变思路,用Python,生成一个上部是矩形,下部比较自然的倾斜撕痕,再保存成SVG文件,像下面的效果。


用途
PPT中可以直接把这个SVG文件拖进去,转换为形状做遮罩,再盖在你要的图片上面,接着先选中图片,再选中遮罩,再在“形状-合并形状-相交”,再添加一个阴影,就可以出来撕纸的效果了。


PS可以用这个来填充图层蒙版,Illustrator可以用这个来生成剪切蒙版。存成SVG主要是为了通用性。
源码
以下是Python源代码,需要安装numpy, matplotlib,tkinter和scipy库
import numpy as np
import matplotlib.pyplot as plt
from matplotlib.path import Path
import matplotlib.patches as patches
import random
from scipy.ndimage import gaussian_filter1d
from tkinter import Tk, Label, Button, Radiobutton, IntVar, messagebox

def perlin_noise(width, octaves=2, persistence=0.5):
    noise = np.zeros(width)
    for octave in range(1, octaves + 1):
        scale = 2 ** octave
        amplitude = persistence ** octave
        points = width // scale + 1

        x = np.linspace(0, 1, points)
        segment = np.random.uniform(-1, 1, points)
        segment[-1] = segment[0]  # 保证首尾一致,避免突跳

        interp_x = np.linspace(0, 1, width)
        noise += amplitude * np.interp(interp_x, x, segment)
    return noise / persistence

def add_teeth(noise, tooth_density=0.2, max_tooth_size=10):
    for i in range(1, len(noise) - 1):
        if random.random() < tooth_density:
            direction = 1 if noise[i] > noise[i-1] else -1
            noise[i] += direction * random.uniform(2, max_tooth_size)
    return noise

def generate_tear_svg(output_path="paper_tear.svg", tear_direction="left_to_right"):
    width, height = 800, 600
    tear_height = height * 0.2  # 撕裂位置靠下方

    # 主撕裂线:低频 + 平滑
    main_noise = perlin_noise(width, octaves=2, persistence=0.5)
    main_noise = (main_noise - np.min(main_noise)) * 30  # 控制波动幅度
    main_noise = gaussian_filter1d(main_noise, sigma=20)

    # 次级纹理(可选)
    secondary_noise = perlin_noise(width, octaves=4, persistence=0.3) * 5
    combined_noise = main_noise + secondary_noise

    # 添加锯齿效果
    final_noise = add_teeth(combined_noise, tooth_density=0.05, max_tooth_size=3)

    # 随机选择撕裂方向
    if tear_direction == "left_to_right":
        slope = np.linspace(0, 30, width)  # 左低右高
    elif tear_direction == "right_to_left":
        slope = np.linspace(30, 0, width)  # 右低左高
    final_noise += slope

    # 构造路径
    vertices = []
    codes = []
    vertices.append((0, tear_height + final_noise[0]))
    codes.append(Path.MOVETO)
    for x in range(1, width):
        vertices.append((x, tear_height + final_noise[x]))
        codes.append(Path.CURVE4 if x % 3 == 0 else Path.LINETO)
    vertices.extend([(width, 0), (width, height), (0, height)])
    codes.extend([Path.LINETO, Path.LINETO, Path.LINETO])

    path = Path(vertices, codes)

    # 生成SVG
    fig, ax = plt.subplots(figsize=(width/100, height/100), dpi=100)
    patch = patches.PathPatch(path, facecolor='black', lw=0)
    ax.add_patch(patch)
    ax.set_xlim(0, width)
    ax.set_ylim(0, height)
    ax.axis('off')
    plt.savefig(output_path, format='svg', bbox_inches='tight', pad_inches=0, transparent=True)
    plt.close()
    print(f"SVG生成成功,已保存到 {output_path}")

def ask_user():
    root = Tk()
    root.title("选择生成数量")
    root.geometry("300x200")

    # 定义变量
    choice = IntVar()
    choice.set(1)  # 默认选择1张

    # 添加 Radiobutton
    Label(root, text="请选择需要生成的图片数量:").pack(pady=10)
    Radiobutton(root, text="1张", variable=choice, value=1).pack()
    Radiobutton(root, text="5张", variable=choice, value=5).pack()
    Radiobutton(root, text="10张", variable=choice, value=10).pack()

    # 添加确认按钮
    def confirm():
        root.destroy()  # 关闭窗口
        return choice.get()

    Button(root, text="确定", command=confirm).pack(pady=20)

    root.mainloop()
    return choice.get()

def main():
    num_images = ask_user()
    if num_images is None:
        return

    for i in range(num_images):
        tear_direction = random.choice(["left_to_right", "right_to_left"])
        output_path = f"paper_tear_{i + 1}.svg"
        generate_tear_svg(output_path, tear_direction)

if __name__ == "__main__":
    main()
方便获取更多学习、工作、生活信息请关注本站微信公众号


推荐内容

相关内容
栏目更新
栏目热门
本栏推荐

 湘公网安备 43102202000103号